
Google Colab是Google Research推出的免费线上服务,可用服务器等级的高级显示卡跑Python程序。有需要的话还可以付费买Pro版,使用更高级的GPU。不过要注意:2023年4月21日,Google Colab员工在 Twitter宣佈,需要付费购买Pro版才可以跑stable-diffusion-webui。免费版用户一侦测到stable-diffusion-webui字串就会被封锁,出现”You may be executing code that is disallowed, and this may restrict your ability to use Colab in the future.“的警告讯息。
Google Colab已有很多现成的Stable Diffusion WebUI笔记本可以直接用,不用自己写程序,例如 camenduru notebook。
如果你想自己写Stable Diffusion笔记本,这边提供一些范本程序,采用最小安装,只安装必要的东西。
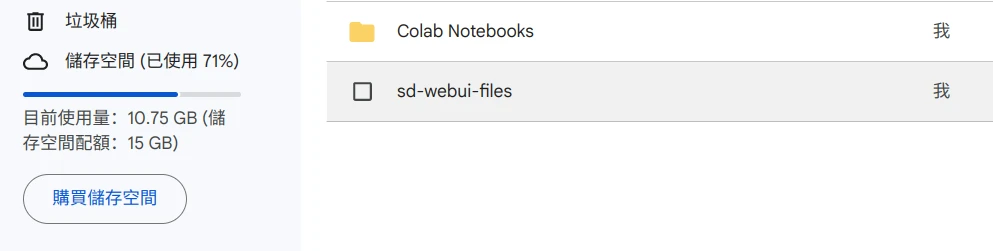
我的想法是將SD WebUI的程式和模型档案放到安装至云端。优点是装好后,以后要用就能二分钟內启动,而不用等下载模型。缺点就是很占云端空间,大概需要10GB左右容量。15GB免费容量只够装一个存档点模型和少许LoRA,再勉强塞个ControlNet的扩充功能。因此程序代码只下载必要的档案,扩充功能需要再另外装。
1. 登录至 Google Colab新增笔记本。

点选新增储存格,填入以下內容。先別点选执行,这边我是分步讲解,后面再將这些程式码合起来。
# 挂载云端硬盘
from google.colab import drive
drive.mount('/content/drive')

# 建立存放程序档案的资料夹
!mkdir /content/drive/MyDrive/sd-webui-files
2. 安装CUDA
# 安装CUDA、xformers、Triton依赖
!pip install torch==1.13.1+cu116 torchvision==0.14.1+cu116 torchaudio==0.13.1 --extra-index-url https://download.pytorch.org/whl/cu116 -U
!pip install -q xformers==0.0.16
!pip install -q triton==2.0.0
3. 复制SD WebUI的代码仓库
# 复製SD WebUI上游的储存库
!git clone --depth=1 https://github.com/AUTOMATIC1111/stable-diffusion-webui.git /content/drive/MyDrive/sd-webui-files/stable-diffusion-webui
4. 下载Anything V4.5存档点模型
!wget -nc -P "/content/drive/MyDrive/sd-webui-files/stable-diffusion-webui/models/Stable-diffusion" "https://huggingface.co/andite/anything-v4.0/resolve/main/anything-v4.5-pruned.safetensors"5. 修正代码仓库版本错误
# 防止其他储存库造成错误
%cd /content/drive/MyDrive/sd-webui-files/stable-diffusion-webui/
!git reset --hard
!git pull
!sed -i -e 's/checkout {commithash}/checkout --force {commithash}/g' launch.py
6. 启动WebUI
# 启动WebUI。直接从launch.py传递引数
!python launch.py --share --xformers --enable-insecure-extension-access --theme light
7. 代码汇总:
from google.colab import drive
drive.mount('/content/drive')
!mkdir /content/drive/MyDrive/sd-webui-files
!pip install torch==1.13.1+cu116 torchvision==0.14.1+cu116 torchaudio==0.13.1 --extra-index-url https://download.pytorch.org/whl/cu116 -U
!pip install -q xformers==0.0.16
!pip install -q triton==2.0.0
!git clone --depth=1 https://github.com/AUTOMATIC1111/stable-diffusion-webui.git /content/drive/MyDrive/sd-webui-files/stable-diffusion-webui
!wget -nc -P /content/drive/MyDrive/sd-webui-files/stable-diffusion-webui/models/Stable-diffusion https://huggingface.co/andite/anything-v4.0/resolve/main/anything-v4.5-pruned.safetensors
%cd /content/drive/MyDrive/sd-webui-files/stable-diffusion-webui/
!git reset --hard
!git pull
!sed -i -e 's/checkout {commithash}/checkout --force {commithash}/g' launch.py
!python launch.py --share --xformers --enable-insecure-extension-access --theme light
8. 在GPU上运行Stable Diffusion
点选左上角执行储存格,允许存取云端硬盘。
等待依赖装完,最后会产生Gradio网址,点进去
接下来的用法就跟装在自己电脑的SD WebUI一样了,也可以从网页界面安装扩充功能。
使用后请点选执行阶段 → 中断並刪除执行阶段。由于相关档案都是放在云端,关闭分页也不会刪除,下次执行可以继续上一次进度。
確认SD WebUI已经安装至云端后,將笔记本的储存格替换为以下程式码。略过下载模型,直接启动SD WebUI。
from google.colab import drive
drive.mount('/content/drive')

!pip install torch==1.13.1+cu116 torchvision==0.14.1+cu116 torchaudio==0.13.1 --extra-index-url https://download.pytorch.org/whl/cu116 -U
!pip install -q xformers==0.0.16
!pip install -q triton==2.0.0

%cd /content/drive/MyDrive/sd-webui-files/stable-diffusion-webui/
!python launch.py --share --xformers --enable-insecure-extension-access --theme lightstable-diffusion-webui会安装到Google云端硬碟的sd-webui-files资料夹下面。想新增模型或扩充功能,往Google云端资料夹的对应资料夹上传档案就可以了。
stable-diffusion-webui下面有几个重要的资料夹:
- extensions:放扩充功能的资料夹
- models/stable-duffusion:放存档点模型
- models/Lora:放LoRA模型
- outputs:生图输出的资料夹


 今日访客人数 :
  本月访客人数 :
  今年访客人数 :
  总访客人数 : 452765
 今日浏览量 :
  总浏览量 :
  在线总人数 :
文章评论